


In today’s digital industrialization, maximizing efficiency and productivity is paramount for businesses of all sizes. With the rapid advancement of technology, automation has emerged as a key strategy, offering immense potential for streamlining operations. A McKinsey Global Institute study revealed that up to 50% of tasks across industries can be automated with existing technologies.
Microsoft Power Automate, is a powerful workflow automation tool that stands at the forefront of this automation revolution, providing a powerful platform to organize workflows seamlessly across applications and services. At its core, the software empowers users to create automated flows, triggered by specific events, to execute a series of actions, which in turn results in the automation of different systems.
In this blog, we will discuss the capabilities and functions of the software in detail. Our explorations will cover Power Automate flows and their types, different triggers, core components, and how you can create your own flows within the software. So, let’s start.
Overview of Power Automate
In 2016, Microsoft launched Power Automate (formerly Microsoft Flow) as a cloud-based service for enterprise workflow automation. The software is part of a larger suite of tools, called Power Platform, which includes Power Apps for building applications and Power BI for business intelligence.
The key idea behind Power Automate is to save you time and effort by automating repetitive tasks. Imagine you have a task that involves copying data from one app to another, sending an email notification, or filing documents – Power Automate can handle those for you and boost your productivity.
The system is designed to be user-friendly, even for people with no coding experience. You can build workflows using a drag-and-drop interface and pre-built templates. A study by Forrester Research found that organizations using this powerful automation tool can achieve a 502% return on investment (ROI) within three years.
What Are Power Automate Flows?
A flow is the fundamental building block of Power Automate. Power Automate flows represent a defined sequence of actions that are triggered by a specific event. The event can be anything from receiving an email to copying and moving files.
The flows can be simple, involving a single action, or complex, with multiple branching paths and conditional logic.
Let’s explain this with a simple scenario. Imagine you have a flow set up to start whenever a new form is added to a specific SharePoint folder. This flow can be designed to automatically send an email to a chosen person (like a manager) to let them know about the new form and maybe include a link to the form for easy access. This way, you don’t need to check manually, and the person gets notified quickly to take further action.
Types of Power Automate Flows
On a broad level, we can divide Power Automate flows into three categories:
- Cloud flows: Cloud flows are the most common type and they are used to automate tasks between various apps and services. They can be further subdivided into three types:
- Automated Flows: These flows are triggered automatically when a specific event occurs, such as receiving an email or a new file being added to OneDrive.
- Instant Flows: These flows are triggered manually by a user through a button click or a custom connector.
- Scheduled Flows: Scheduled Power Automate flows run on a predetermined schedule, such as daily, weekly, or monthly.
- Desktop Flows: To automate the tasks on your computer, Desktop flows are used. They are very similar to how Macros work on your pc. For example, these workflows can handle the tedious task of copy-pasting between spreadsheets or renaming multiple files.
- Business Process Flows: They guide users through a step-by-step process, often involving approvals or data collection.
- Cloud flows: Cloud flows are the most common type and they are used to automate tasks between various apps and services. They can be further subdivided into three types:
Power Automate Flow Lifecycle
The lifecycle of a Power Automate flow follows the principles of Application Lifecycle Management (ALM) laid down by Microsoft. Following these methods and guidelines ensures that the risk of glitches and errors in your enterprise workflow automation project is minimized. Here is a simplified version of the ALM:
Development:
This is the first stage and here a flow is created using the Power Automate’s designer. In this initial stage, you’ll define triggers (events that initiate the flow), actions (steps the flow performs), and conditions (decisions the flow makes based on data).
Testing and Version Control:
Once built, the flow undergoes thorough testing to ensure it functions as expected and doesn’t introduce errors. This can be done by both manual testing and by using special testing tools. Version control is crucial in this stage to track changes made to the flow over time. Power Automate offers built-in versioning or integration with external version control systems.
Packaging and Deployment:
When testing is complete, the flow is packaged into a solution, which is a container that groups related components like flows, canvas apps, and data tables.
Production and Monitoring:
Finally, when the flow is ready to use, it is introduced to users. However, even in this final stage monitoring is essential to track the flow’s performance, identify any issues, and ensure it operates as expected.
Core Components of A Flow
Before we can move on to learn how to create a flow in Power Automate, it is important to understand the individual components that make up a flow. So, let’s discuss them one by one.
1. Triggers
As discussed earlier, a trigger is basically an event or an action that kickstarts the flow. It’s the same as a gun trigger. When you pull it, the bullet fires. There can be various types of flow triggers, but we can categorize all of them into two groups based on their functionality and the type of initiation.
By Functionality:
- Manual Flow Triggers: These are initiated by the user on-demand, like a button click. Useful for repetitive tasks you need to run occasionally.
- Automated Triggers: They are fired automatically based on a specific event or condition. These events can be anything from receiving a new email to adding a new item to a SharePoint list. Power Automate continuously monitors these services for trigger events and executes the associated flow when a match is detected.
By Initiation:
- Scheduled Triggers: These run based on a predefined schedule you set, like sending weekly reports.
- Instant Triggers: Instant type launches immediately when a specific event occurs, like receiving a high-priority email.
- UI-based Triggers: These types of triggers are powered up by user interactions with a user interface, such as submitting a form in Power Apps.
2. Actions
Actions are the tasks performed after a flow is triggered. Power Automate actions can be anything from sending an email or creating a file to updating a record in a database or posting a message to a chat channel.
Each action has input parameters that you configure to define its behavior. These parameters can take values directly entered by you or use variables from your flow for dynamic control.
Power Automate provides a comprehensive library of pre-built actions for interacting with various services. Some popular actions include:
- Sending emails with Outlook
- Creating and updating files in SharePoint
- Posting messages to Teams channels
- Extracting data from websites
- Applying text recognition on images
3. Connectors
Power Automate connectors are the building blocks that allow you to connect your flows to various applications, services, and data sources. These connectors bring your data together and automate workflows across those systems.
There are hundreds of connectors available, covering a wide range of popular services like:
- Microsoft 365 (Office 365)
- Dropbox
- Google Drive
- Slack
- Trello
- Mailchimp
- Salesforce
- Dynamics 365
- And many more…
You can find a complete list of Power Automate connectors on the Microsoft website.
4. Conditions and Control Structures
Power automate conditions allow you to introduce decision-making capabilities into your flows. Based on specific criteria, the flow can execute different paths or actions.
Power Automate doesn’t utilize traditional programming structures like in languages such as Python or Java. Instead, it relies on a collection of actions specifically designed for flow control within its interface. These actions allow you to manipulate the order in which different parts of your automation execute.
Control Structures
Power Automate features various control structures to define the flow of logic within your flows. Some common control structures include:
- Conditional Actions (If/Else): These mimic the functionality of if/else statements. You can define conditions and execute specific actions based on whether those conditions are true or false.
- Loops: Power Automate offers a variety of loop actions like “For Each” to iterate through collections of data and perform actions on each item.
- Run Subflow: This action allows you to call and execute another, pre-defined subflow within your main flow. This promotes modularity and reusability.
- Go To: This action lets you jump to a specific point (labeled) within your flow, enabling you to create loops or branching logic.
Building Flows: How To Create Power Automate Flows
Prerequisites and Setup
To learn how to create a flow in Power Automate, you’ll need a Microsoft account with access to a license. Plus, you will need one or more solutions for your flow to work.
Choosing a Template vs. Creating from Scratch:
The software has pre-built flow templates and you can also create your own flows from scratch. To learn how to create power automated flows, let’s take a look at creating a cloud flow as an example. This flow will send an automatic notification to your mobile when you receive an email.
Select The Type of Flow You Want To Create:
- Log in to your Power Automate account.
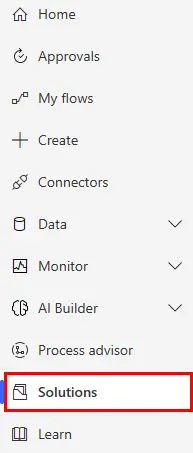
- Select “Solution” from the left menu.
- Then select the solution in which you want to create the flow.
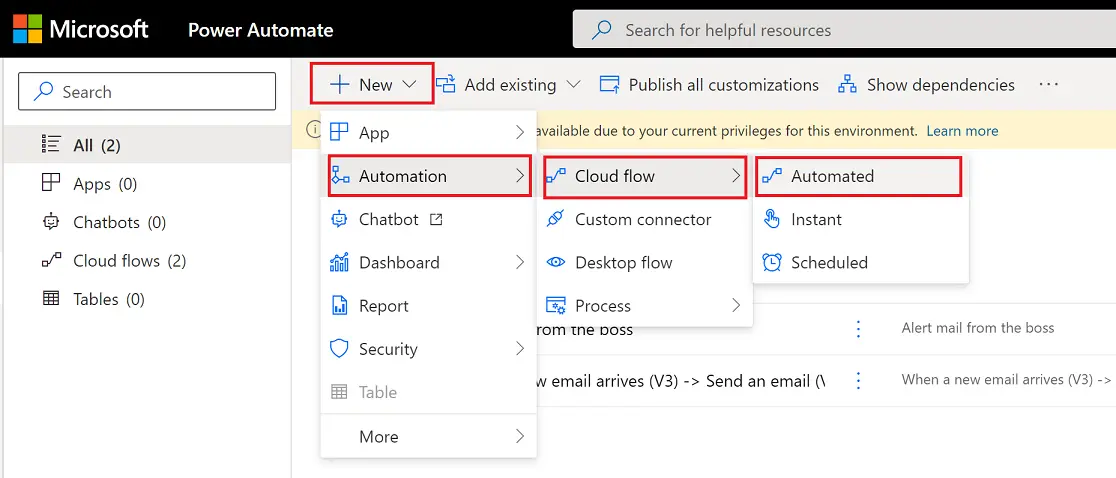
- On the upper left corner click New.
- Scroll down to select Automation > Cloud flow > Automated. This will create an automated type of Cloud flow.
Define The Trigger:
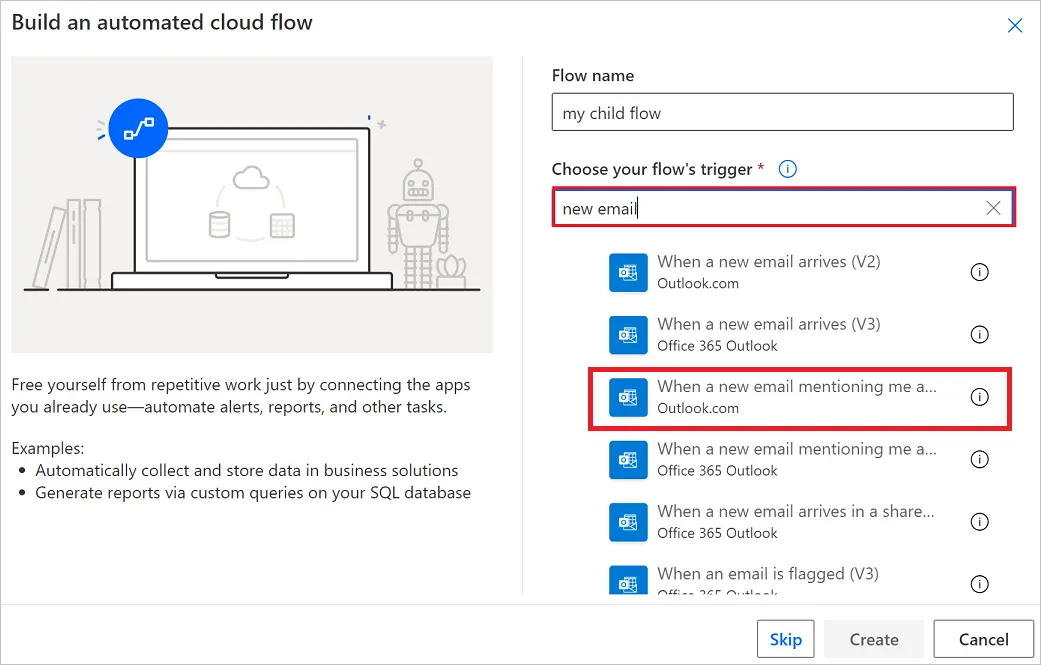
- After selecting the Automated flow type, a prompt box will appear.
- Enter a Name for your flow.
- Select a trigger from the pre-built trigger list. For this example, we will select When a new email arrives (V3) trigger.
- Select Create, to set up your flow trigger.
- After selecting the Automated flow type, a prompt box will appear.
Setting The Action:
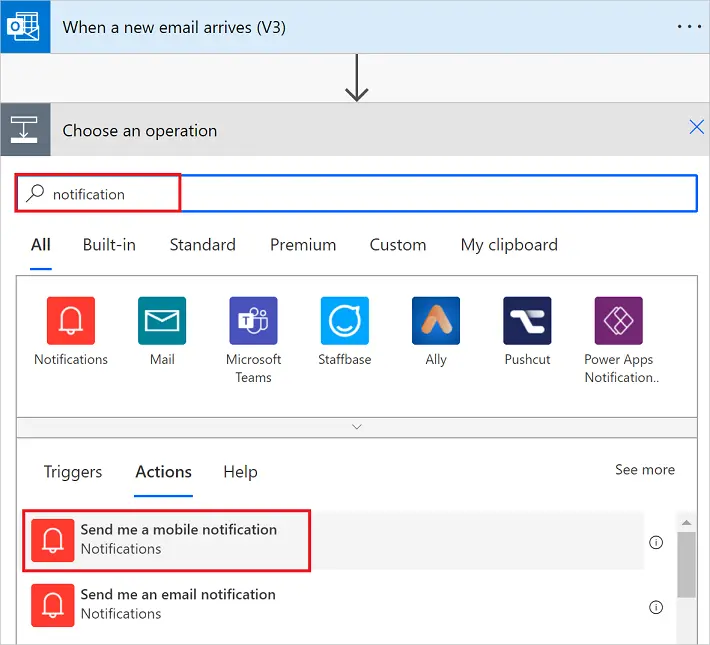
- In the box, select New Step.
- In the search box, type Notification. The select Send me a mobile notification.

- Add a Subject and click Save to complete your flow setup.
How to Duplicate a Flow in Power Automate
Duplicating a flow allows you to create a copy of an existing flow as a base for modifications. This is useful for creating variations of a flow with slight adjustments.
- Within “My flows,” locate the flow you want to duplicate.
- Click the ellipsis (…) and select “Duplicate“.
- Provide a new name for the duplicated flow and click “Create“.
- Modify the duplicated flow as needed, adjusting triggers, actions, or conditions.
Tips for Customizing Duplicated Flows
- Clearly differentiate the duplicated flow from the original by using a descriptive name.
- Update triggers, actions, or conditions to reflect the desired variation in functionality.
- Maintain clear documentation within the flow
Advanced Flow Features
1. Parallel Branching
Parallel branching allows a flow to execute multiple actions simultaneously, rather than sequentially. This can significantly improve flow performance for tasks that don’t rely on the output of one action before another.
Parallel branching is beneficial for scenarios where actions are independent and don’t require data from each other. For instance, a flow might need to send confirmation messages to multiple managers concurrently or update records in two separate databases simultaneously. By leveraging parallel branching, the flow can complete these tasks much faster compared to a sequential execution.
2. Error Handling and Troubleshooting
Even the most meticulously designed flows can encounter errors during execution. Common errors include connection issues, invalid data formats, or permission limitations.
Utilize “Configure Run After” Effectively:
- Each action in Power Automate offers “Configure run after” settings. By default, an action runs if the previous one succeeds. You can define what happens upon failure.
- Use Scopes to group actions and set “run after” settings for the entire scope. This helps isolate errors within the group.
Informative Error Notifications:
- Set up alerts to notify administrators or support staff upon flow failures.
- Provide context in the notification emails. Include details like the flow name, error message, and a link to the flow run for easier troubleshooting.
Leverage Built-in Error Reporting:
- Power Automate offers built-in error reporting for analyzing flow failures.
- Use the “Flow run history” to identify trends and pinpoint problematic areas in your flows.
Best Practices and Tips
Keeping Flows Simple and Readable
Strive for clarity and maintainability in your flow design. Avoid overly complex logic structures and use comments to explain the purpose of each step.
Naming Conventions and Documentation
Implement consistent naming conventions for triggers, actions, and variables to enhance flow readability. Document the flow’s purpose, functionality, and any assumptions made within the design.
Reusing and Sharing Flows
Capitalize on reusable components by building modular flows with well-defined functionalities. Share reusable flows within your organization to promote consistency and efficiency.
Avoiding Common Pitfalls that Can Slow Down Flows
- Excessive use of complex expressions or calculations within flows.
- Making unnecessary calls to external APIs for data retrieval.
- Employing inefficient looping mechanisms within the flow.
Real-World Use Cases
Al Rafay Consulting was contacted by a client who was facing challenges in processing their huge pile of over 50000 invoices with limited employees. To solve this challenge Microsoft experts at ARC used Power Automate to streamline and boost their slow invoice processing methods.
As a result, the company saw an 80% reduction in their invoice processing time and saw a 60% reduction in process costs. That’s the power of this revolutionary platform.
Conclusion
Mastering Power Automate empowers you to unlock a world of automation possibilities. By understanding the core components, best practices, and advanced features, you can streamline and automate repetitive tasks, enhance communication, and boost efficiency across your organization. If you’re looking to leverage Power Automate for your business, Al Rafay Consulting‘s team of certified Microsoft experts can help you design and implement powerful enterprise automation solutions.