Installation of Let’s Encrypt SSL Certificate On your IIS Web Server

Blog

You are here:
SSL certificate

The purpose of the SSL Certificate is to secure or encrypt communication between the client and the website. In this article, client represents your browser such as Internet Explorer, Google Chrome, or Firefox, etc. Website is any website that you are accessing from server on which SSL Certificate is installed. In this blog, we will get and install a certificate from the Let’s Encrypt certificate authority that provides free SSL certificates.

PREREQUISITES

Following are the prerequisites for installing SSL Certification:

1. IIS Web Server – IIS Web Server should be running and serving websites and web APIs.

2. Add a Web Site or a Web API–Add and configure web API or website with HTTP and HTTPS. Before installing SSL Certificate, a website or web API can be accessed using HTTPS but it will exchange data in plain text and the browser will indicate it by a cross on the padlock at the start of the address bar. To apply certificate we have added “mysite” with the following ports and protocols:

HTTP 8014 & HTTPS 414

3. Open Port on Windows Firewall – Open the ports 8014, 414, and 80 on Windows Firewall.

4. Port Forwarding on DSL Router/Azure Portal – Open the ports 8014, 414, and 80 on Azure Portal for the VM on which IIS Web Server is running. If using your server then open the above ports on the DSL router and forward these ports by the IP of the local server.

Note: Port 80 must be opened because the SSL Certificate application communicates and validates the certificate through this port.

5. Public IP – Find and note the public IP of your ISP. For example, 72.248.102.155

6. DNS A Record on your Domain – Create a DNS A Record on the domain that will be used as hostname for the website/web API. For example

mysite.yourdomain.com    72.245.112.145

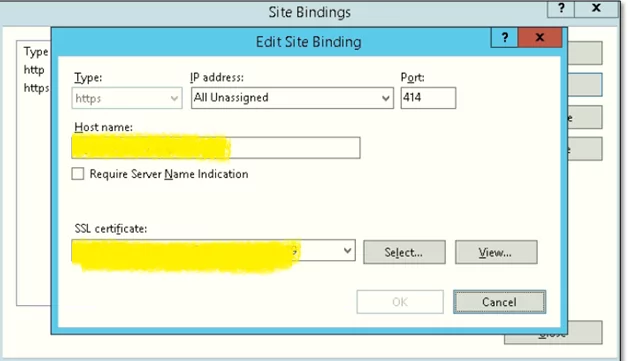
7. Update Website Binding with DNS A Record – Now edit binding of the website/web API and add HTTPS protocol with port 414, add mysite.yourdomain.com in the hostname, and IIS Express Development Certificate under SSL Certificate

CERTIFICATE INSTALLATION

Visit the win-acme site and download the client application on IIS Web Server.

SSL

Step 1:

Download and unzip the “win-acme.v2.1.14.996.x64.pluggable.zip” and then rename the unzipped folder to win-acme.v2.1.14

winacme 150x99 1

Step 2:

Copy it in Program Files and open this folder.

Step 3:

Run the “wacs.exe” as Administrator and type N on the console of the application. Then type identifier the website. (In this case, 11)
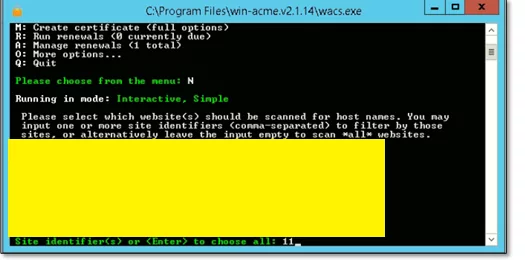
cmd

Step 4:

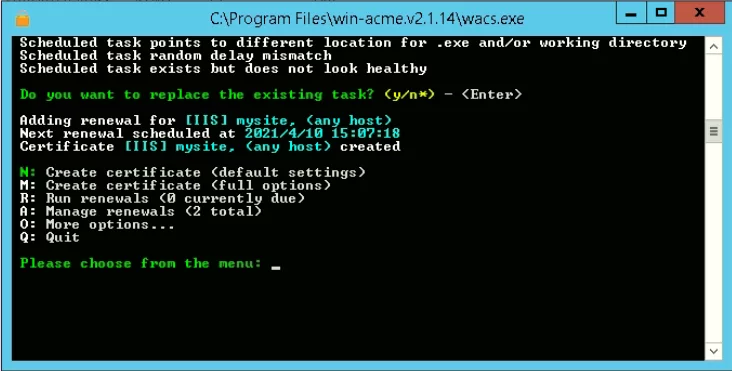
Now type A and for confirmation type Y. After a few seconds application will complete the certificate creation and will produce the following results. Congrats, certificate created and bounded to mysite.
cmd2
binding

TESTING YOUR SITE

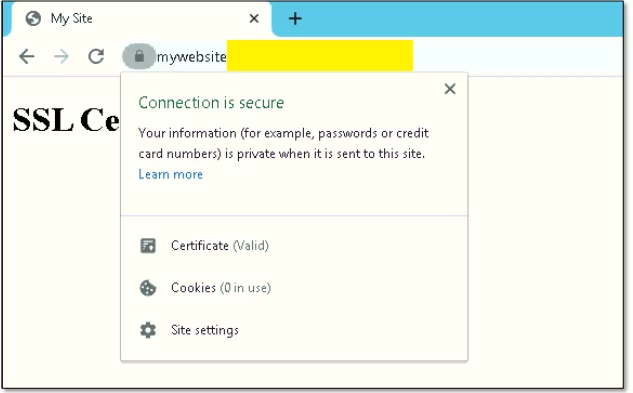
After binding the SSL to your website, you should test that SSL is working properly. Browse the website in a new tab. You will find the padlock icon in the address bar. On clicking the lock icon you will find the following information about the certificate.

For more detail on testing your site with SSL, see the Microsoft instructions on how to set up SSL on IIS.
final

CONCLUSION:

In this article, we have learned how to install and bind SSL Certificate to the website. This is critically important as the information you send on the internet is passed from multiple sources before it reaches the destination server.

For any questions, please comment below. I will be pleased to help more.

Al Rafay Consulting‘s team of SSL Certification experts is skilled in guaranteeing effective SharePoint custom solutions with results beyond expectations. They are experienced in creating new SharePoint custom development, enhancements to an existing SharePoint solution, or upgrades to the SharePoint environment.

Latest Posts

Recent Posts

Sign Up for Our Newsletter and Stay Ahead of the Curve

Stay updated with the latest technology trends with our weekly newsletter

Blog

You are here:

Installation of Let’s Encrypt SSL Certificate On your IIS Web Server

SSL certificate

The purpose of the SSL Certificate is to secure or encrypt communication between the client and the website. In this article, client represents your browser such as Internet Explorer, Google Chrome, or Firefox, etc. Website is any website that you are accessing from server on which SSL Certificate is installed. In this blog, we will get and install a certificate from the Let’s Encrypt certificate authority that provides free SSL certificates.

PREREQUISITES

Following are the prerequisites for installing SSL Certification:

1. IIS Web Server – IIS Web Server should be running and serving websites and web APIs.

2. Add a Web Site or a Web API–Add and configure web API or website with HTTP and HTTPS. Before installing SSL Certificate, a website or web API can be accessed using HTTPS but it will exchange data in plain text and the browser will indicate it by a cross on the padlock at the start of the address bar. To apply certificate we have added “mysite” with the following ports and protocols:

HTTP 8014 & HTTPS 414

3. Open Port on Windows Firewall – Open the ports 8014, 414, and 80 on Windows Firewall.

4. Port Forwarding on DSL Router/Azure Portal – Open the ports 8014, 414, and 80 on Azure Portal for the VM on which IIS Web Server is running. If using your server then open the above ports on the DSL router and forward these ports by the IP of the local server.

Note: Port 80 must be opened because the SSL Certificate application communicates and validates the certificate through this port.

5. Public IP – Find and note the public IP of your ISP. For example, 72.248.102.155

6. DNS A Record on your Domain – Create a DNS A Record on the domain that will be used as hostname for the website/web API. For example

mysite.yourdomain.com    72.245.112.145

7. Update Website Binding with DNS A Record – Now edit binding of the website/web API and add HTTPS protocol with port 414, add mysite.yourdomain.com in the hostname, and IIS Express Development Certificate under SSL Certificate

CERTIFICATE INSTALLATION

Visit the win-acme site and download the client application on IIS Web Server.

SSL

Step 1:

Download and unzip the “win-acme.v2.1.14.996.x64.pluggable.zip” and then rename the unzipped folder to win-acme.v2.1.14

winacme 150x99 1

Step 2:

Copy it in Program Files and open this folder.

Step 3:

Run the “wacs.exe” as Administrator and type N on the console of the application. Then type identifier the website. (In this case, 11)

cmd

Step 4:

Now type A and for confirmation type Y. After a few seconds application will complete the certificate creation and will produce the following results. Congrats, certificate created and bounded to mysite.

cmd2
binding

TESTING YOUR SITE

After binding the SSL to your website, you should test that SSL is working properly. Browse the website in a new tab. You will find the padlock icon in the address bar. On clicking the lock icon you will find the following information about the certificate.

For more detail on testing your site with SSL, see the Microsoft instructions on how to set up SSL on IIS.

final

CONCLUSION:

In this article, we have learned how to install and bind SSL Certificate to the website. This is critically important as the information you send on the internet is passed from multiple sources before it reaches the destination server.

For any questions, please comment below. I will be pleased to help more.

Al Rafay Consulting‘s team of SSL Certification experts is skilled in guaranteeing effective SharePoint custom solutions with results beyond expectations. They are experienced in creating new SharePoint custom development, enhancements to an existing SharePoint solution, or upgrades to the SharePoint environment.

Share This Post

Your email address will not published. Require fields are marked *

Contact Information

Have any questions or interested in our services? We’re here to help! Reach out to us, and our dedicated team will swiftly respond to your inquiries. 

Contact Information

Ready to Explore? Whether You Want to Discuss Our Services or Have Queries, Feel Free to Send Us a Message and Let’s Get Started.